
Add Import Backup Restore Business
Manager Setup

Adding A Business
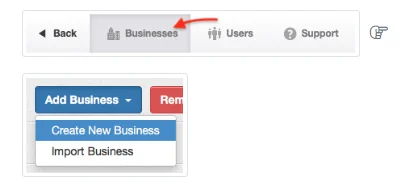
Adding a new business to Manager is simple. After you have downloaded, installed, and launched the program on your computer or accessed it via a web browser, go to the Businesses tab, click Add Business, and select Create New Business in the dropdown box:
Enter the Business Name you want to appear in your list of businesses. A Country will be selected automatically, based on your detected location. Or, you can select a country from the dropdown menu. You should choose the country of your primary business or tax registration. Clicking Add Business will add any available country-specific localizations and create a business data file for the new entity:

Selecting a country gives you a good start on setting up your business, including:
- Pre-set base currency
- Pre-set date and number formats
- A chart of accounts tailored for the country, with accounts necessary to match mandatory structures and accommodate localized requirements
- Tax codes
- Payslip items necessary to implement local payroll laws
Remove A Business
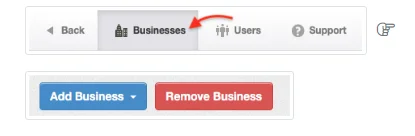
After terminating a business or restoring one from backup, redundant or unneeded business names may appear in the Businesses tab. These can be removed. Go to the Businesses tab and click Remove Business
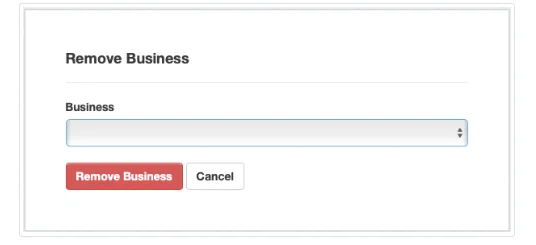
Select the business to be deleted in the dropdown box and click Remove Business:
Note
Removing a business name does not delete the business, which is not stored in the application. It only removes its name from the Businesses list. The business’ complete data file will remain in the application data folder. But, inside the application data folder, it will be transferred to the Trash sub-folder. To completely eliminate the business, it must be deleted from there.
Backup A Business
Accounting data for businesses in Manager can be backed up, restored, and transferred using a backup file. A backup for a business stores all information necessary to completely recreate its accounting records, including transactions, customer and supplier information, inventory status, reports, attachments, as well as custom themes and settings. Using backups, you can:
- Recover data after it is lost, as when a storage drive fails
- Recover data from an earlier time, for example, before someone began making entry errors
- Transfer data between computers
- Build redundant data caches
- Migrate data to different editions of the program (desktop, server, or cloud)
A backup includes data of only one business. If you have multiple accounting entities, each must be backed up separately. If desired, these backups can be to separate locations. And a single business can be backed up to multiple locations.
Making a backup
As long as new accounting data is being recorded, backups should be made frequently. A general guideline is to back up your data often enough that you would be willing and able to re-enter recent data to bring your records up to date. For high-volume businesses, that realistically means backing up at least daily. For lower-volume entities, weekly or monthly backups might suffice, as long as necessary records would be available if data loss occurs.
Creating a backup file is very simple. Under the Businesses tab, click on the name of the business you are backing up. (This step is unnecessary if you are already within the business.)

Then click the Backup button at the top right of the Manager window. The default backup will include all attachments, emails, and history for the business. You will have the option to exclude any or all of these by unchecking boxes:

The backup file will automatically be assigned the name of the business as it appears on the Businesses page and will contain a date stamp to indicate when the backup was created. This file name can be edited. Click Backup to save the business. Depending on your operating system, the software will offer to save the backup file somewhere on your local drive. Generally, you should choose a different location.
You should store backups separately from your computer. That way, if the computer fails, the backup will remain intact. Choose an appropriate backup medium and location, considering cost, convenience, and the value you place on your accounting data (including the effort required to recreate it). For protection from hazards or theft, the backup should aso be kept at a separate physical location. Some possibilities include:
- USB flash drive
- External drive
- Network-connected drive
- Writable CDs or DVDs
- Cloud storage service (e.g., Dropbox, OneDrive, or iCloud)
Importing or Restoring A Business
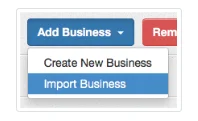
Import or restore a business from backup (there is no difference) under the Businesses tab by clicking Add Business and selecting Import Business:
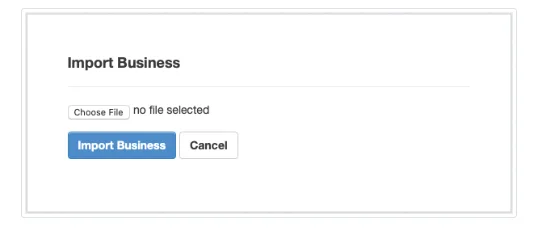
To import a business, click Choose File, browse to the location of your stored backup or other business data file you want to import and select the file:
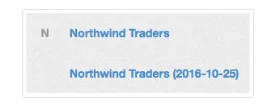
Click Import Business to complete the process. You will be returned to the Businesses tab listing your businesses. In this illustration, a backup of Northwind Traders from 2016 has been imported:
Click on the imported business to open it so you can verify it was restored properly:

Note
The business name at the top of the Manager window retains the same date stamp as the backup file you imported. But forms and reports in the data file keep the trading name entered at Settings Business Details. This can be useful for differentiating versions of restored businesses. If you do not want the date stamp to show, you can rename the data file either before or after importing it to remove the date stamp.
The business name at the top of the Manager window retains the same date stamp as the backup file you imported. But forms and reports in the data file keep the trading name entered at Settings Business Details. This can be useful for differentiating versions of restored businesses. If you do not want the date stamp to show, you can rename the data file either before or after importing it to remove the date stamp.
Caution
Manager will not prevent adding or importing businesses with identical names. To avoid confusion, such as when renaming and restoring a backup file by eliminating the date stamp, consider removing other businesses with the same name from the Businesses tab first.
Manager will not prevent adding or importing businesses with identical names. To avoid confusion, such as when renaming and restoring a backup file by eliminating the date stamp, consider removing other businesses with the same name from the Businesses tab first.
Transferring Data
A backup file can also be used to transfer accounting data between computers or editions of the program. The Backup button works exactly the same way on any platform. Follow these steps:
- Choose a backup destination accessible to all computers involved in the transfer.
- Back up the business to the backup destination.
- Install Manager on the computer to which the data is being transferred, or access the server or cloud edition of the program via a browser on that machine.
- Use the Add Business function to import the business to the new computer’s or browser’s list of businesses.
Cautions
New versions of Manager can open files created by older versions of the program. But sometimes, in doing so, they modify the data structure to incorporate new features. Therefore, older versions of the program cannot always import and open backups from newer versions of the program. Therefore, be sure all versions of the program on all machines involved in data transfers are the same. And be aware, if transferring to or from the cloud edition, the cloud edition is automatically updated.
Additionally, if importing backups made by very old versions of Manager, you may see a dialog box telling you the file is not an SQLite database. For a long time after conversion of Manager to the SQLite structure, an automatic conversion script was included with updates. But that was discontinued after version 20.9.89. If your backup is very old, you will need to update its file structure in two stages by installing an archived copy of Manager version 20.9.89 first, opening the file with it, and then updating your application further. Search the Forum for discussions about how to do this.