
Batch Create-Update
Manager Setup > Starting Balances

Batch Create and Batch Update
Batch Create and Batch Update functions streamline large-scale creation and updating of information in Manager. They can be used in most functional Tabs and Settings.
These batch operations are available whenever you see these buttons in the bottom-right corner of the Manager window:

Batch functions I recommend that will speed up setting up Manager:
- Batch create to add your customers and batch update to update custom fields that you've added
- Batch create to add your suppliers and batch update to update custom fields that you've added
- Batch create to add inventory items and batch update to update inventory quantities ,average cost, and prices and to also update any custom fields
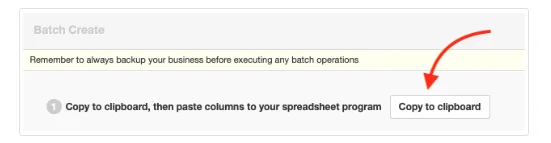
Batch Create
To add new items to a tab, regardless of whether others already exist, click Batch Create. Follow the instructions sequentially. First, copy the blank template by clicking Copy to clipboard:
Paste the template into your spreadsheet program:

The template contains only column titles. It tells you what information is required for the batch operation.
Note
Illustrations in this Guide are for batch operations on inventory items, but procedures are the same wherever batch operations work. The blank template changes automatically.
Illustrations in this Guide are for batch operations on inventory items, but procedures are the same wherever batch operations work. The blank template changes automatically.
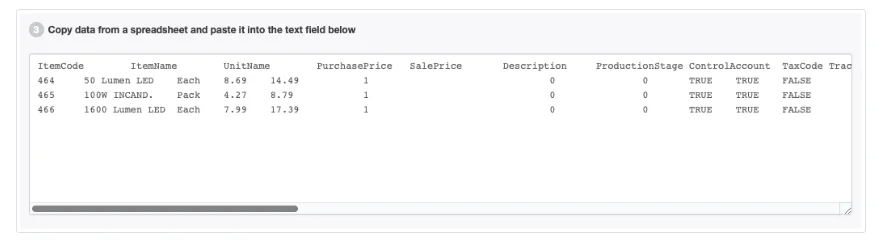
Fill data into the empty spreadsheet template:

Example
Brilliant Industries enters information for some of its lighting products:

Notes
To understand each column, it may be helpful to first complete one entry of the type you are creating, filling all fields. Copy the resulting listing from the Batch Update window (see instructions below) and paste into a spreadsheet as an example. If columns are not understood, leave them blank. You can always edit them later.
In some cases, columns may contain 32-character hexadecimal strings known as UUIDs (universally unique identifiers) or GUIDs (globally unique identifiers) rather than plain-language text. These are used to identify bank accounts, custom fields, and other information, depending on the transaction type. Before batch operations can be used successfully, you will need to build a list associating UUIDs with specific accounts or ledgers. Without the correct UUIDs, Manager will ignore entries in batch operations.
When pasting into a spreadsheet for batch operations, date and number formatting in Manager and your spreadsheet program must be compatible to achieve common data interpretation. Typically, if number or date formats are not compatible, pasted content will be interpreted as text by the spreadsheet application. Text format may be acceptable if no calculations are required. But if number or date formats are needed, text to number or date format conversions are often available in the spreadsheet application. In some spreadsheet applications, regional settings must be modified to achieve compatibility. Pay particular attention to ambiguous date formats and decimal separators. Consult your spreadsheet documentation for further information.
Finally, copy and paste data for the newly created entries from the spreadsheet back into Manager. Be sure to copy and paste the column headings in addition to the data.
Click Next to review the information being added. If satisfactory, click Batch Create to enter the new items into Manager:

If not satisfactory click the Back button, modify the spreadsheet, and repeat the pasting process.
Example
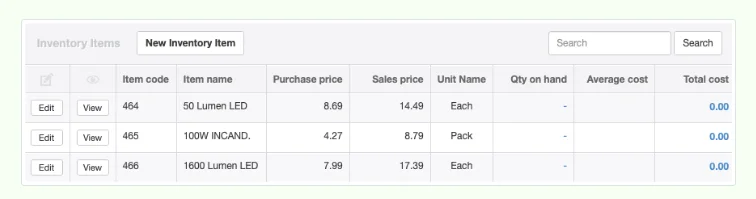
Brilliant Industries’ batch-created inventory items now appear in the Inventory Items tab:
Brilliant Industries’ batch-created inventory items now appear in the Inventory Items tab:
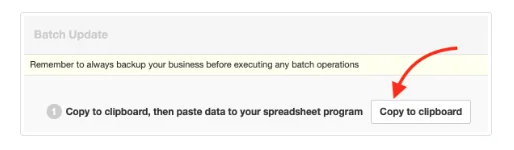
Batch Update
Batch updates are used to modify already existing items in a tab. They are somewhat simpler than batch creation, because the structure of the database is more obvious. Click on Batch Update. Again, follow the sequential instructions:
Example
Brilliant Industries decides to raise prices on its LED products using the Batch Update function. It copies and pastes inventory item data into a blank spreadsheet:

Note that each line in the spreadsheet now has a unique hexadecimal Key.
Use the spreadsheet program to update data:

For convenience, you can reorder rows or remove any you don’t need to update from the spreadsheet. You can also leave them in place, however. Do not remove or modify any content in the Key column for rows you keep.
Caution
Do not, under any circumstances, remove columns in the spreadsheet while updating. This will result in deletion of all content in those columns for included transactions.
Do not, under any circumstances, remove columns in the spreadsheet while updating. This will result in deletion of all content in those columns for included transactions.
Example
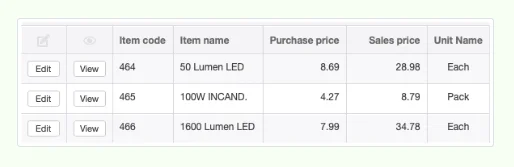
Brilliant Industries deletes the incandescent light bulb product, leaving only LED inventory items. It doubles their prices, using spreadsheet tools:
Brilliant Industries deletes the incandescent light bulb product, leaving only LED inventory items. It doubles their prices, using spreadsheet tools:

Copy and paste the updated data from the spreadsheet back into Manager. Be sure to copy and paste column headings in addition to the data. Click Next to review changes being made. If satisfactory, click Batch Update.
Example
Brilliant Industries’ pastes in the modified spreadsheet data and reviews it:
Brilliant Industries’ pastes in the modified spreadsheet data and reviews it:
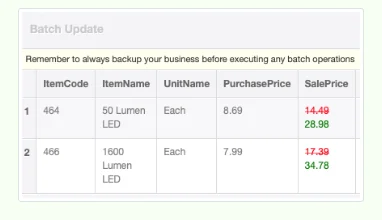
After acceptance, the updated Inventory Items list shows increased sale prices on LED products. The 100W incandescent bulb’s listing has not changed:
Note
You cannot add elements when using Batch Update, because a key is required for every row in the database. These keys are generated when new elements are added. To add elements in groups, use Batch Create
.
Batch Delete
Batch Delete removes selected entries in a tab, table, or list that have no records associated with them. The function is useful for such tasks as:
- Deleting erroneous bank statement imports with many transactions or imported transactions that duplicate manual entries
- Emptying tabs of unneeded customers, suppliers, assets, and so forth when constructing a standard business “shell”
- Correcting systemic data entry errors
The operation is begun by clicking the button at the bottom right corner of any screen where it can be used:

Warning
The Batch Delete operation can be reversed through the History file. And, as with editing throughout Manager, the program will not allow you to delete anything that has already been referenced by another transaction. Still, Batch Delete is a brute-force tool. Use it cautiously. And always back up your data before any batch operation.
The Batch Delete operation can be reversed through the History file. And, as with editing throughout Manager, the program will not allow you to delete anything that has already been referenced by another transaction. Still, Batch Delete is a brute-force tool. Use it cautiously. And always back up your data before any batch operation.
Select and delete data
After clicking the Batch Delete button, you will see a list of data from the table you were viewing, with individual and group checkboxes on the left. Check the boxes for all data entries you wish to delete. Manager will not allow you to check the box of any element already referenced in a transaction:
Elements of the list can be edited and viewed, if necessary, to correct or confirm their content while in batch delete mode. Just click the appropriate buttons. Entries can be unchecked if you decide not to delete them. When satisfied you wish to delete all remaining checked entries in the table, click the red button:

Note
If the list extends to more than one page, only those records displayed on a page are affected.