
Closing an Accounting Period
Manager Setup > Summary > Summary Tasks

Closing an Accounting Period
Historically, the accounting cycle involved numerous tasks to “close the books” at the end of an accounting period, whether a month, quarter, or year. Income and expense summaries were developed, trial balances were created, amounts were transferred with journal entries, and so forth. Most steps were designed to:
- Zero out income and expense accounts before starting a new accounting period
- Identify and correct errors
- Limit accumulation and propagation of mistakes from one period to the next
These practices developed over centuries, not only to support meaningful analysis, but also to combat unavoidable omissions, mental miscalculations, and oversights when entering and posting hundreds or thousands of transactions manually.
Manager eliminates the need for most of these steps by:
- Performing all calculations electronically, eliminating arithmetic errors
- Basing automatic double entries on type of transaction and account selection by the user, reducing the need for manual journal entries with their requirement to deduce which accounts to debit and credit
- Furnishing real-time feedback when journal entries are made, reducing the possibility of unbalanced transactions
- Leaving incorrect, incomplete, or unbalanced transactions in Suspense until fixed
- Carrying forward information from one period to the next in a perpetual database
- Setting displays and reports to cover defined time periods
Closing the books
At the end of any accounting period, just a few tasks are normally required. For many businesses, these steps are only performed annually:
- Make necessary adjusting entries (when using accrual basis accounting) for prepaid expenses and income items.
- Make desired distributions of earnings to capital or equity accounts using journal entries.
- Pay out desired dividends or draws.
- Create desired reports for the accounting period. These might be limited to a Profit and Loss Statement and Balance Sheet. Of course, others can be added to suit needs of management, accountants, or tax authorities. Reports can be printed, stored electronically, or just saved in Manager.
- Consider locking past transactions by setting the lock date once end-of-period adjustments are complete. This prevents changes to transactions forming the basis for statutory reporting obligations and tax returns.
Note
For many small businesses, especially sole traders/proprietors, none of these steps might be necessary. Perhaps the business has no prepaid items. Depending on the equity structure of the chart of accounts, the second and third steps might have happened over the course of the accounting period. And reports can always be generated later if they are needed.
For many small businesses, especially sole traders/proprietors, none of these steps might be necessary. Perhaps the business has no prepaid items. Depending on the equity structure of the chart of accounts, the second and third steps might have happened over the course of the accounting period. And reports can always be generated later if they are needed.
Setting up the next accounting period
The only essential step prior to entering transactions for the next period is resetting the period in the Summary tab. Click on Edit:

Be sure the box is checked to Show balances for specified period. Otherwise, all transactions from the date Manager was first used will be included. Enter the first day of the new accounting period in the From field. Normally, select Today as the To date so the Summary is always current, but no transactions entered in advance will be included until their entry dates are reached:
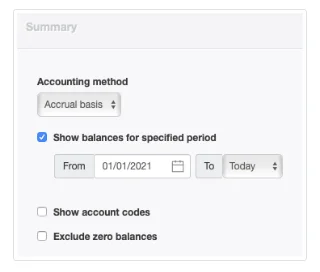
To begin accounting work for the new period, click Update.
You might want to define common reports for the new accounting period, too. That way, they will be quickly available when needed. But they can also be created later.
Lock Date
In Manager, closing an accounting period is not required, but a lock date can be set to prevent any changes that affect financial ledgers on or before a desired date.
Go to the Settings tab and click Lock Date:

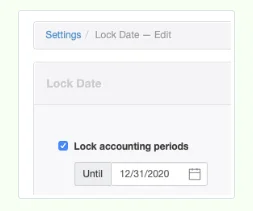
Check the box to Lock accounting periods and enter the desired lock date. Then click Update. A closed lock icon will appear at the top of the Manager window:

Clicking on the icon will take you back to the Lock Date page in the Settings tab.
Example
Maria wants to prevent any changes to financial statements before 1 January 2021. She sets the lock date to 31 December 2020:
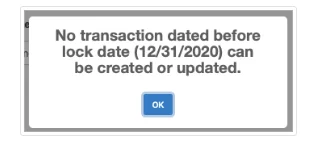
If you try to edit or delete any transaction dated on or before the lock date, a warning message like this will appear:
You can temporarily remove the lock date if you need to edit or delete a transaction by clicking on the lock icon. If you uncheck the box, the lock date is removed and the icon disappears. However, if you leave the box checked, but delete the date, an open lock icon appears. Enter the lock date again when you have completed the changes to previously locked transactions.
Notes
Lock Date is useful in multi-user editions of Manager to prevent typical restricted users from modifying locked transactions. Withhold access to the Lock Date feature to prevent them from unlocking restricted transactions and changing data. For administrators or restricted users with full access, the feature will still act as a reminder to prevent accidental data modification. They will need to deliberately remove the lock date before changing protected data.
The best practice for temporarily suspending the lock date depends on who is authorized to make such changes and whether they will know the desired lock date. Unchecking the box removes all visual evidence of a lock date. You need to navigate back to the Lock Date page to recheck the box. But the date will still be in place. Deleting the date places a visual reminder on every page so you can more quickly navigate back to the Lock Date page. But you must re-enter the date to reactivate the lock.
The lock date does not prevent modification of descriptions, notes, and so forth. Nor does it prevent pending bank transactions from being cleared.