
Custom Fields
Manager Settings > Custom Fields

Custom Fields
Custom fields help tailor Manager to specific needs of your business, accounting workflow, and local laws and customs. After custom fields have been defined, they can be placed on forms, accounts, definitions, and displays to record and present information not essential to operation of the program but useful for other purposes.
Availability
Custom fields can be placed on records and transactions for most functional tabs enabled in the navigation pane:
- Bank and cash accounts
- Receipts and payments
- Inter account transfers
- Expense claims
- Customers and suppliers
- Sales and purchase quotes
- Sales and purchase orders
- Sales and purchase invoices
- Delivery notes and goods receipts
- Credit and debit notes
- Inventory items
- Inventory transfers
- Inventory write-offs
- Production orders
- Employees
- Payslips
- Billable time entries
- Fixed and intangible assets
- Capital accounts
- Special accounts
- Journal entries
- Folders
- Business details
- Inventory kits
- Non-inventory items
- Payslip earnings, deduction, and contribution items
- Tax codes
- Withholding tax receipts (for tax withheld at source, not payroll withholding, which is set up as a payslip deduction item)
They can also be placed for several categories in the Settings tab:
- Sales and purchase quotes
- Sales and purchase orders
- Sales and purchase invoices
- Credit and debit notes
- Delivery notes and goods receipts
- Receipts and payments
- Inventory transfers
Custom fields mentioned above apply to an entire transaction or record. But custom fields can also be defined and placed for individual line items on the following transaction forms:
Creating custom fields
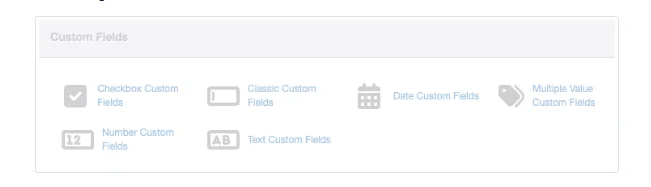
To create a custom field, go to the Settings tab and click Custom Fields:

Six subcategories will be available:
Note
Subcategories that have not yet been used will be displayed in muted colors. Once a subcategory has been used, it will show in darker tones and be physically separated from unusued subcategories:
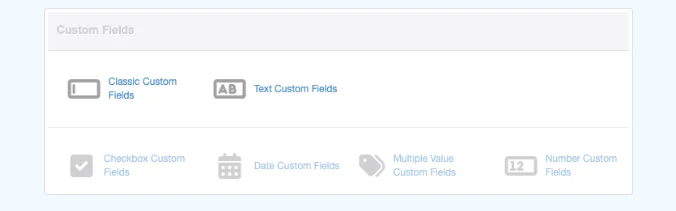
All your old custom fields that were automatically converted by Manager will be listed on the Classic Custom Fields page and can be edited or viewed there. Click one of the other types to create, edit, or view checkbox, date, multiple-value, number, or text custom fields.
Note
Although classic custom fields can still be created, this is not recommended. The subcategory will eventually be eliminated, and all classic fields will be converted to corresponding subcategories.
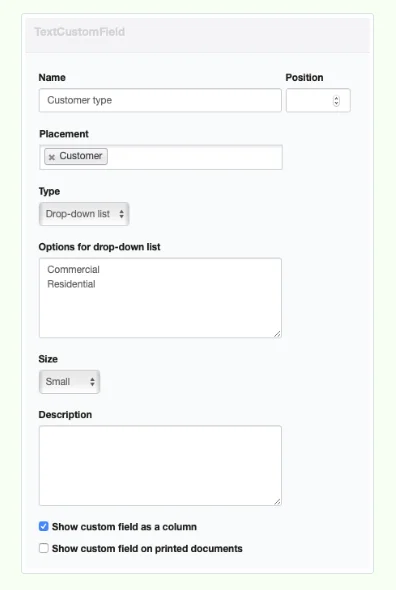
Click New Custom Field. Complete the definition. The screen for a text-type field is illustrated below:
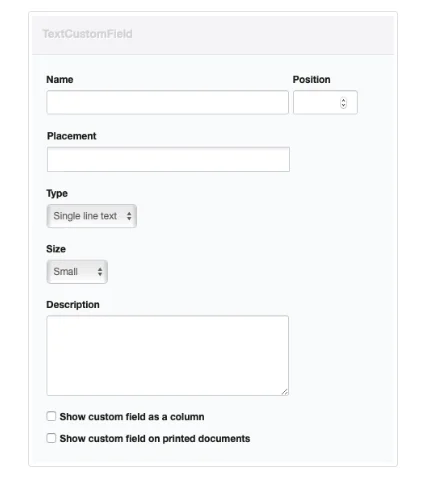
- Name is your assigned label for the custom field. This label will appear where appropriate on forms or displays to designate the field. So it should be something you are willing for customers and suppliers to see if you designate the field to show on printed forms.
- Position controls the order in which custom fields appear on entry screens and finished documents. Enter a number, if desired. Otherwise, custom fields will appear in alphabetical order. Position has no influence on where custom fields appear in the Custom Fields listing in Settings. Therefore, you can have multiple overlapping sequences (1, 2, 3…) for custom fields that are not placed on the same record or transaction forms.
- Placement is where you choose which records, settings, and transaction forms will make use of the custom field.
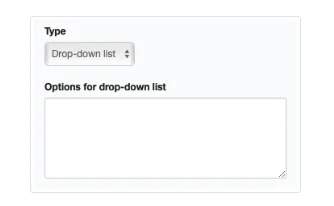
- Type lets you choose Single-line text, Paragraph text, Dropdown list, Image, Date, or Number as the nature of the field. Dropdown list in the Type field brings up a new field, Options for drop-down list, where you can enter fixed choices for the list, one per line:
- Size allows a choice of Small, Medium, or Large for either text type. Your selection will alter the size of the field on the entry screen so you know how much text will fit.Note
Type and Size fields are not present for checkbox, date or number custom fields. - If the custom field is multiple-value, Options can be entered:
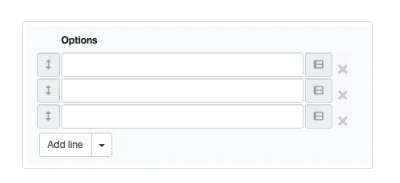
- The options can be re-ordered by dragging their arrows up or down
- Description provides a place to explain a custom field’s purpose to users. Information entered here does not appear anywhere on a transaction form.
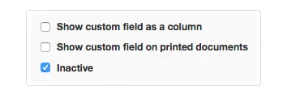
- Check Show custom field as a column if you want the field to be included in listings of the relevant tab.
- Check Show custom field on printed documents to display the field on forms.
- If the Show custom field on printed documents box is checked, another checkbox appears to indicate whether to Show at the top of printed documents:
- If the box is not checked, custom fields appear at the bottom.
Click Create to save the custom field. Later, the field can be edited. Be sure to click Update after editing.
Placing custom fields
Custom fields are placed on specific record, setting, or transaction types in the Placement dropdown menu field. Click in the field or begin typing to see a list of available placements. Multiple placements can be chosen for any custom field.
Example 4
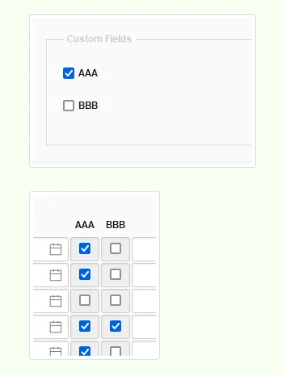
Checkboxes are used to indicate Yes/No or True/False situations. They can be placed at the transaction or line-item level. Consider a situation where two options are available, AAA and BBB. A checkbox custom field is defined and named for each option. Both are placed on various transactions and transaction lines. Wherever either checkbox appears, a check indicates the option is present or true, the condition is satisfied, etc.:
Checkboxes are used to indicate Yes/No or True/False situations. They can be placed at the transaction or line-item level. Consider a situation where two options are available, AAA and BBB. A checkbox custom field is defined and named for each option. Both are placed on various transactions and transaction lines. Wherever either checkbox appears, a check indicates the option is present or true, the condition is satisfied, etc.:
Example 5
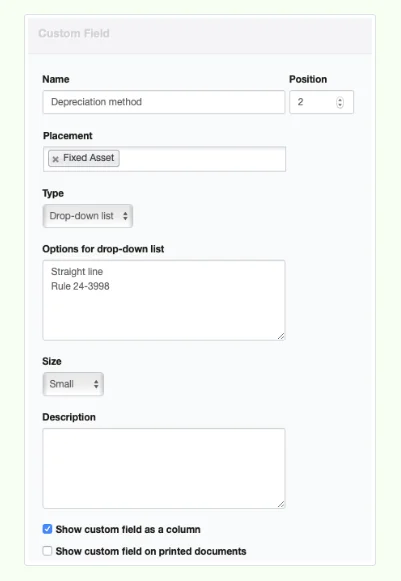
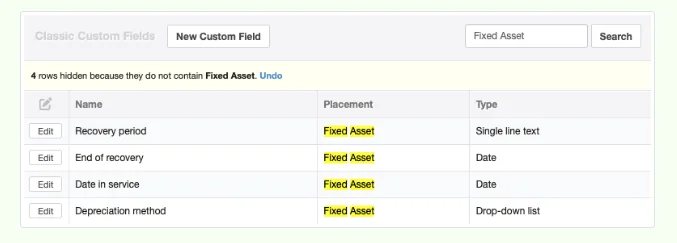
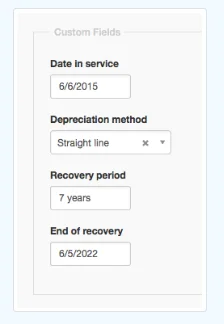
Roger, the accounting manager at Northwind Traders, wanted to closely monitor depreciation and disposition of fixed assets to be certain the company followed prescribed accounting standards. Prior to Manager version 22.8.12, he created four custom fields for Fixed Assets. One was a dropdown list, one single-line text, and two were dates. All were designated to show as columns. After Roger updated Northwind’s software, these fields are found under Classic Custom Fields. For example, one field was named Depreciation method:
All four fields appear in the Classic Custom Fields page listing:
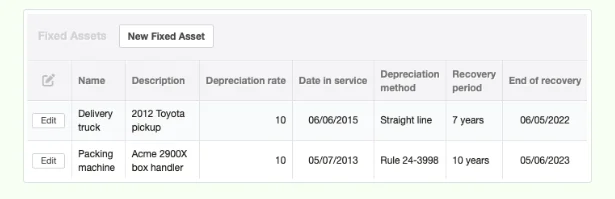
When Roger views the Fixed Assets tab, he sees a more complete picture of the company’s fixed assets than just their acquisition costs and depreciation:
Example 6
Anastasia sells her glass artwork both to wholesale corporate distributors and directly to residential customers. To remind herself of discount rates and payment terms, and to simplify marketing campaigns, she establishes a text custom field, Customer type, placed on customer records. She sets it to show as a column:
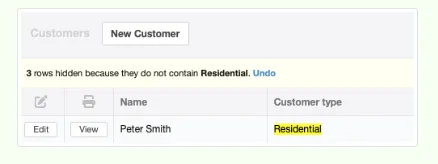
Before mailing a new brochure targeting residential customers, she uses the Search function to filter her customer list:
Example 7
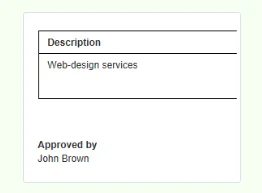
ModTek Design Associates wants its customers to know which partner has reviewed and approved billings. It creates a text custom field, placed on sales invoices, naming it
Approved by and checking the box to show on printed documents. The field will show at the bottom of sales invoices:
Example 8
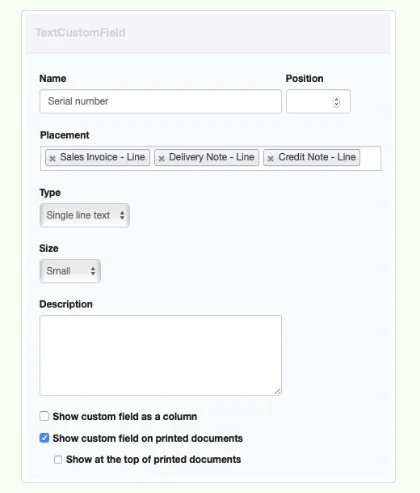
Quick Computers wants to include serial numbers of inventory items sold on its sales invoices, delivery notes, and credit notes (in case of returned merchandise). It creates a custom field for individual lines, placed on those three transaction types. Because some product serial numbers can contain letters as well as numerals, it creates a text custom field:
Now it can record exactly which unit has been involved in any of those three transaction types:

Notes
Entry screens always show custom fields, grouped as such except for line-item fields. For example:
But fields show on completed forms and as display columns only when they contain an entry and the field has been defined to show on the relevant form or display.
Default text that you want to appear in a custom field on all new forms should be entered under Form Defaults for that transaction form.
Default text that you want to appear in a custom field on all new forms should be entered under Form Defaults for that transaction form.
Making custom fields inactive
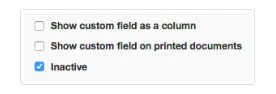
Manager will not allow custom fields to be deleted if they have already been used. If a field outlives its usefulness, check the box to make it inactive. (The box does not appear when custom fields are first being created):
Inactive custom fields no longer appear on record or transaction entry screens where they are placed. They can be reactivated by clicking Edit and unchecking the box. Always click Update after editing.